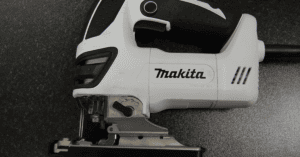

Nothing is more frustrating than your HVLP spray gun getting stuck while painting a surface. Regular cleaning is a must to ensure optimal sprayer performance that gives a smooth and even application.
You must disassemble the sprayer and wash the small parts to clean an HVLP spray gun. You can use paint thinner to remove more stubborn paint buildup.
However, you may want to take caution during disassembly to prevent lost or damaged parts. You will also need a few other supplies for cleaning the HVLP spray gun. This article will teach you how to clean an HVLP spray gun for peak performance.
Why Do You Need to Clean An HVLP Spray Gun?
HVLP (high volume, low pressure) spray guns make painting various surfaces quicker and more convenient. After the paint job, you may find it tempting to leave the clean-up for later. Avoid doing so because the paint will dry inside the gun and get stuck. It can also lead to corrosion, which ultimately reduces the lifespan of the paint spray gun.
It is essential to clean an HVLP sprayer right away. Regular and thorough washing can prevent paint buildup and damage to the equipment. It also ensures efficient spraying performance that will deliver smooth, even application.
What Supplies Do You Need for HVLP Spray Gun Cleaning?
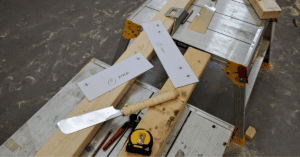
You will need a few supplies to give your HVLP paint gun a thorough cleaning.
You can purchase a professional spray gun cleaning kit when you have the budget to spare. Otherwise, check the list below for the necessary cleaning equipment. The chances are you already have some supplies on hand.
- Soapy water
- Paint thinner or other cleaning solutions
- Paper towels or rags
- Soft-bristled cleaning brushes
- Toothpicks
- Gun wrench (usually comes with the HVLP spray gun)
- Plastic cups or buckets
- Safety gloves
- Protective glasses for the eyes
What Are the Different Ways of Cleaning Your HVLP Spray Gun?
There are different ways to clean your HVLP paint spray gun. We will explore these various cleaning materials before teaching you the detailed cleaning steps.
Paint Thinner
A paint thinner is among the best ways to clean your HVLP spray guns. As its name suggests, it can dilute oil-based paints and varnishes stuck in your paint sprayer gun.
Acetone
Acetone is another great solvent to use when cleaning an HVLP sprayer. It can remove stubborn paint, grease, and other residues on your spray gun. However, be careful when working with acetone because it is flammable and toxic.
Spray Gun Cleaning Kit
If you frequently use an HVLP sprayer, it might be best to purchase a dedicated spray gun cleaning kit. This set of tools allows you to reach all the cracks and crevices in the sprayer. Thus, it can thoroughly clean HVLP, LVLP, and other sprayer types.
How To Clean an HVLP Spray Gun?
Now that we have shown all the cleaning options for HVLP sprayers, it is time to guide you on how to clean them. Before handling the equipment, we recommend wearing safety gloves and goggles to protect your hands and eyes.
1. Wash the Paint Cup
This spray gun part probably contains the most paint or fluid. So you will want to clean the paint cup first.
Fill half the paint cup with soapy water. Cover it with the cap before shaking it hard to loosen the paint buildup.
Use paint thinner, acetone, or other cleaning solutions when dealing with more stubborn stains. Again, give the cup a good shake to dilute the fluids. You can also pull the trigger to allow the paint to spray into a plastic cup or bucket. Doing so will enable the solution to clean the paint out of the main body.
2. Disassemble the Gun Sprayer
After cleaning the paint cup, detach it from the gun body. Set it aside to dry completely.
Then, disassemble the rest of the HVLP spray gun body.
Start to remove the collar and air cap.
Next, unscrew the fluid control knob to access the fluid needle. Be careful when handling the needle because it has a spring load. Simply squeeze the trigger to pull the needle out.
Finally, use a wrench to loosen the air cap’s inner part.
Depending on the model, your HVLP spray gun might have extra components you need to remove. Check the user manual to learn how to disassemble them.
3. Keep An Eye on the Spray Gun Parts
Once you have disassembled the HVLP spray gun, you may be tempted to dump all the parts in water for cleaning. However, avoid doing so because small components, such as the fluid needle, can easily get lost and damaged.
It is best to wash the larger parts first before moving to the tiny pieces. You may also want to label the components while cleaning to prevent confusion. Again, look at the user manual to learn more about each spray gun element and its functions.
At the end of the day, spray gun cleaning does not need to be difficult. Having an organized cleaning system will significantly help.
4. Use Paint Thinner to Dissolve Paint
After organizing the parts, you can now start cleaning.
Fill a water bucket with paint thinner. You can also use soapy water and other cleaning solutions, depending on your preference and the type of paint you use.
Soak the spray gun components in the thinner for several minutes. The solution will break up any paint residue, making it easier to clean the equipment thoroughly.
5. Wipe Each Part Thoroughly
Next, grab a soft brush to wipe off paint and other residues on the HVLP spray gun. You will find it easier to remove these stains since the device has been soaking for a while.
You also use a toothpick to clean any paint buildup stuck in the crevices or ridges inside the parts.
Then, wipe the fluid needle and spring with a rag or paper towel soaked in the cleaning solution. Handle these fragile parts carefully, as they can easily bend and get damaged.
6. Reassemble the HVLP Spray Gun
Finally, you can put back the different parts of the HVLP spray gun after a thorough cleaning.
Reassembling your HVLP sprayer will now be easy since you already know how to take it apart. Just backtrack on the steps.
First, secure the fluid needle and the loaded spring into place. Next, screw on the inner air cap followed by the outer component.
Attach the paint cup back to the spray gun’s body and put on the cap.
7. Consider Additional Caring Tips
If you frequently use your HVLP spray gun, follow these extra care tips to keep it in optimal shape.
Those who own a Fuji Spray with a gravity cup design must avoid attaching the spray gun to a turbine. Instead, loosen the fluid knob located at the sprayer’s rear end. Simply allow the paint residue to stream out of the fluid nozzle.
When cleaning a Fuji T-Model Spray Gun System, detach the air diffuser, diffuser seal, and air diffuser. Soak these parts in a cleaning solvent to remove stubborn residues. Use small picks or pipe cleaners to clean hard-to-reach areas.
Finally, avoid using a metal brush or wire for cleaning HVLP spray gun systems. The abrasive metal can leave significant damage to the delicate parts.
Frequently Asked Questions
How do you clean an HVLP spray gun between coats?
You will realize that most paint jobs need more than a single coat. You need to clean your HVLP spray gun between coats to prevent paint buildup.
To do this, detach the paint nozzle from the sprayer. Rinse it with water. You can also use paint thinners to dilute more stubborn stains. After cleaning the nozzle, you can reattach it to the sprayer and carry on with the paint job.
How long can you leave paint in an HVLP spray gun?
You can hold off cleaning the paint in an HVLP spray gun if you do not have time to wash it. However, you can only leave the paint in the sprayer for up to three days. After that period, you will find that the material has already hardened. Thus, it is more difficult to clean. It is best to wash the HVLP sprayer every time after your last coat to ensure optimal working conditions.
Can I use mineral spirits to clean the HVLP spray gun?
You can use mineral spirits to remove paint in the HVLP spray gun.
These cleaning products work similarly to paint thinners. Mineral spirits contain pure petroleum distillates without additives. They can dilute oil-based paint. At the same time, they clean stains, spills, and varnishes.
Conclusion
The HVLP spray gun can easily get clogged or damaged when you leave the paint to dry. Regular cleaning is essential to prolong its lifespan.
You can use paint thinner to dilute pigments and varnishes. But first, you will need to disassemble the HVLP sprayer for thorough cleaning. Follow the steps above to achieve optimal spraying performance.
If you have more questions about HVLP sprayer cleaning, please reach out via our contact page.